Tuesday, April 24, 2012

Charlie's Rhubarb Cake

Well, last night was the official start to my baking marathon. My family is flying in for the wedding tomorrow and they all had different requests for baked goods that they wanted. On top of that, I decided I was going to make a rhubarb cake for our neighbor, Charlie. 


We "country folk" don't like having people living on top of us, but Charlie and his wife, Cindy, live just across the road from us and have quickly become good friends. If we have to have people (besides family) live near us, we are so thankful that it is Charlie and Cindy. They are good neighbors and they always take care of us. Cindy always gives us Christmas and Easter presents and Charlie helps Jordan out with miscellaneous tasks.


Anyway, a few weeks ago, Charlie came across the road and asked me how our garden was doing. I told him it was so-so and I mentioned that I thought the rhubarb would be ready kinda early and I didn't know what I was going to do with all the rhubarb I would have besides making a pie. I have three big rhubarb plants and I literally cut a few stalks for a pie and the give the rest away. Such a waste! Soooo, Charlie told me one of his favorite treats was a rhubarb cake that his mother used to make him. The next day he was sitting on his porch waiting for me to come home and he walked over his mother's recipe for rhubarb cake!


As a little thank you for helping out with so much and for keeping an eye on the house while Jordan was away last week, I decided I was going to make him a rhubarb cake. I snuck a few pieces for us to try and so I could share with Pap and Grandma, too. I thought it was really good! It has a nice balance of sweet and tart. No one else has tried it yet so I don't know what the verdict is for sure, but I think it will be a thumbs up since they are an easy crowd to please :)


Breakfast!


Charlie's Rhubarb Cake


Ingredients


For the cake:
1 1/2 cups brown sugar
1/4 cup granulated sugar
1/2 cup shortening
2 eggs, well beaten
1 teaspoon vanilla
1 teaspoon baking soda
2 cups flour
2 cups rhubarb, finely chopped


For the topping:
1/4 cup sugar
1teaspoon cinnamon


Directions:
Cream the sugars with the shortening. Add the eggs. Mix in vanilla and baking soda. Blend well. Add 2 cups flour and mix. The dough will be thick like cookie dough. Add the finely chopped rhubarb. Mix and pour batter into a greased and floured 9x13 inch pan. Sprinkle the sugar and cinnamon mixture on top.


Bake 35-40 minutes at 350 degrees.


*You can tell it's an old recipe by how simple the instructions are!

Monday, April 23, 2012

Rhubarb Jam

Ok so I've been a lazy blogger lately, but I have a good excuse... I'm getting married this weekend! I've been so busy getting things around for the wedding so I don't really have anything interesting to blog about when I spent my week running errands.


It's wet, cold, and snowy here in Central PA today - yuck! Jordan didn't go into work today due to the inclement weather, so I made us some coffee and tried out the rhubarb jam I made last night.


Snuck a bite (or two) before snapping a pic!

Last year, Jordan's grandma and I made a strawberry rhubarb jam and we were horribly disappointed. It was good, but not what I wanted - it tasted more like strawberry jelly than anything. What I was really looking for was a jam that had a good rhubarb flavor and was a little more tart. A couple of weeks ago I started searching the internet for rhubarb jam recipes in anticipation for our rhubarb that was getting big.

Yesterday, Jordan and I fertilized the garden with Eve, picked some asparagus, and checked on the rhubarb. Our rhubarb was ready so Jordan cut a handful of stalks and I decided I was going to try a recipe I found on Sugarlaws, a random blog I stumbled upon, for a simple rhubarb jam. 

Eve "helping" Jordan spread fertilizer in the garden.

Pretty rhubarb from our garden!

Rhubarb Jam

Ingredients
1 pound rhubarb (approx 2 cups)
3/4 cups sugar
1/2 cup water
1 teaspoon pectin*

*Note: There are different instructions for pectin depending on what brand you get, so just make sure you read the directions on the box of yours. I used Sure Jell, and you just need to sprinkle it in the recipe.


Directions
Trim the ends off the rhubarb and cut the stalks into 1/2 inch slices.


In a medium saucepan, cook rhubarb, sugar, and water on medium heat until the rhubarb breaks down into mush, about 8-10 minutes. Add the pectin and cook the rhubarb, constantly stirring, until it is thick enough that you can see the bottom of the saucepan when you move the mixture aside, about 5 minutes.

Remove the rhubarb from heat and put into a food processor and puree quickly for about 30 seconds (I skipped this step because it looked cooked down enough and I didn't have huge chunks of rhubarb left). Place the jam into a container and refrigerate for 3 hours, or until the jam is set. 


*Note: If you pour your jam into a glass jar, make sure you put a spoon in the jar before you pour it in so that the glass doesn't crack. The spoon absorbs some of the heat from the jam, therefore avoiding a big mess!

This recipe yields about 12 oz. of jam. You can keep it in the fridge for 3 weeks, but if you can it properly, you can keep it for up to a year. 

Tuesday, April 17, 2012

The Verdict

The verdict is in -- I am going to have more surgery on my tibia on May 1st.


Notice the lack of plans for the rest of the month since I'll be recuperating... again.


That's only two days after our wedding, but I'd rather get it over with so I can get back to work sooner and also because my parents will still be in town. I have a CT scan scheduled for this Thursday to get a more accurate reading of my bone so that my surgeon, Dr. Schutt, can finalize his game plan for my surgery. Dr. Schutt is the BEST orthopedic/trauma surgeon ever and he has the best surgical staff too. Seriously, if you live in Central PA and have a broken bone, go see Dr. Schutt. He's nice, young, and kind of a child genius -- like Doogie Howser status, but waaaaay cuter.


Dr. Corey Shutt

I know it seems like crappy news that I have to have more surgery, but in reality, it could have been A LOT worse. Jordan was kind of telling me to prepare for the worst news possible, which I definitely did; so when I found out my bone was partially healed I was elated. Eight weeks ago it was not healed at all. Since my tibia is now partially healed, Dr. Schutt said the surgery won't be as aggressive since he thinks he can keep the rod in place. I will still have to have a bone graft, which means taking a piece of my pelvis from the iliac crest and implanting it into the area of my tibia that isn't growing back, but the recovery will be a piece of cake compared to what I went through last fall. In fact, my surgery is probably going to be out patient and worst case scenario is that I have to spend one night in the hospital! 

I'll keep you all posted as soon as I hear more! 

Friday, April 13, 2012

Courtney Crocker's Banana Cream Pie

A friend of mine from when I was growing up, Courtney, has a really cute blog that I read frequently. Sometime last summer, she posted a recipe for a banana cream pie that I tried and LOVED. Anyway, in her post about it she said it was a favorite in her family and after making the pie just once last summer, it quickly became a favorite amongst the Breon clan, too. I also brought it to a BBQ we had at church last summer and it was eaten up quickly -- I came home with an empty pie plate! One of my favorite parts about cooking and baking is when I get to see people enjoy something I have made.


I woke up when Jordan's alarm went off this morning and actually got out of bed (I usually stay in a little bit longer!). I haven't been sleeping very well or very much because I'm pretty nervous about my next appointment with my surgeon and because the wedding is starting to creep up on us. I went downstairs and got annoyed that my bananas were, once again, too ripe for me to just eat plain. Soooo, I dug out my copy of Courtney's banana cream pie recipe, made some coffee, and started making it at 6:30 yesterday morning!


This is all that is left of the pie today! I shared with Pap and Grandma, too :)


Here is the link to Courtney's post about her pies. There are also a couple other pie recipes that look pretty yummy that I probably should try sometime soon!


Courtney Crocker's Banana Cream Pie


Graham Cracker Crust
One block of graham crackers
One stick of butter
1/4 cup sugar (optional)


*Note: I buy the graham cracker crumbs in bulk from a local super market, so I measure out about 1 1/2 cups of the crumbs. Also, for some reason it's not as sweet as when you crush the graham crackers yourself, so I always add sugar when I use the the crumbs from the store.


If crushing your own graham crackers you can use a food processor or put the crackers in a bag and crush with a rolling pin until you get a fine consistency. Melt butter in a large bowl; add graham cracker crumbs and sugar and combine with melted butter.


Next, pour the graham cracker crumb mixture into an 8-9 inch pie plate (I think all of mine are 9 inches and DEEP!). Use your hands to lightly press crumbs into the plate and bake for about 7 minutes at 350 degrees to set the crust.


Banana Cream Pie Filling
1/3 cup sugar
2 Tablespoons cornstarch (I make mine really good tablespoons)
1/8 teaspoon salt
2 cups whole milk
2 egg yolks, lightly beaten
4 Tablespoons butter
2 teaspoons vanilla 
2 bananas, sliced


In a sauce pan, mix the sugar, cornstarch, and salt until well combined. Turn heat on stove to medium and slowly pour in milk. Stir constantly until thick and boiling. Boil for one minute. Pour half of the mixture into egg yolk mixture and blend quickly. Pour the egg yolk mixture back into the pan, still stirring constantly. Let it come to a boil, and boil for one more minute. Stir in the butter and vanilla into the pudding.


Line the bottom of the crust with sliced bananas.


Pour the pudding mixture on top of it. 


Put it in the fridge for a couple of hours to let the pudding set. When you're ready to serve, top it with whipped topping.

Wednesday, April 11, 2012

Chicken Fried Rice

When we were down at Aunt Lori's for Easter, she had some left over meat from the meal that she said she was going to use to make chicken fried rice, a dish her husband, Uncle Jeff, really enjoyed. I asked her for the recipe and she told me it came out of Better Homes and Gardens - The New Cookbook. Well, I decided I was going to make it sometime this week because Grandma had roasted a chicken and told me I could take what I wanted to make the dish.


There are about a thousand different versions of that book and in the version Grandma had, the recipe was on a completely different page than what Lori told me. If you're looking for it in your book, it might be under chicken casseroles because that's where we found it.


Chicken Fried Rice
(From Better Homes and Gardens - The New Cookbook)


Ingredients
1 cup diced cooked chicken
1 tablespoon soy sauce (I use low sodium)
1 cup uncooked long-grain rice (I use Jasmine rice)
1/3 cup salad oil
2 1/2 cups chicken broth (Again, I use low sodium)
1/2 cup coarsely chopped onion
1/4 cup finely chopped green pepper
1/4 cup thinly sliced celery
2 slightly beaten eggs
1 cup freshly shredded lettuce or Chinese cabbage (I used lettuce)


Directions without Pictures
Combine chicken, soy sauce, and 1/2 teaspoon salt (I didn't add salt because I thought there was enough of that in the soy sauce). Let stand 15 minutes. Cook rice in hot oil in skillet over medium heat till golden brown; stir frequently. Reduce heat; add chicken with soy sauce and broth. Simmer, covered, 20 to 25 minutes or till rice is tender. Remove cover last few minutes. Stir in onion, green pepper, and celery. Cook, uncovered, over medium heat till liquid is absorbed. Push rice mixture to sides of skillet. Add eggs; cook till almost set; blend into rice. Stir in lettuce; serve at once with soy sauce. Serves 6.


Directions with Pictures
Combine chicken and soy sauce and let it stand for 15 minutes. I actually used 2 cups of chicken instead of the 1 that the recipe called for.

While I let that stand, I chopped up the onion, green pepper, and celery and shredded the lettuce. I have more veggies that what the recipe calls for because we like veggies and I was too lazy to actually measure everything out.


Then, I cooked the rice in the hot oil over medium heat in a skillet, stirring frequently, until it was golden brown.

I reduced the heat and added the chicken and soy sauce mixture, and the chicken broth. 

I put the cover on the skillet and let it simmer until the rice was tender, approximately 20 minutes.

Next, I added the chopped onion, green pepper, and celery...

...and mixed it all up and cooked it until all the liquid was absorbed.

I pushed the rice mixture to the side of the skillet...

...and added the slightly beaten eggs. I beat in an extra egg too because we also like eggs!

I mixed the eggs up a little...

...until they were just set...

...and then blended it in with the rice mixture.

Finally, I added the shredded lettuce.

And supper is SERVED!

Jordan and I enjoyed the meal and I would make it again since it was so fast and easy! I'm all about quick meals, if you can't tell!

Bonnie Holdren's Banana Nut Bread

A few years ago, Grandma gave me a cook book called Pleasures from the Good Earth from the Sugar Valley United Methodist Charge. Jordan's great-grandmother went to that church and she has several recipes in the book that were submitted in her memory. It's a really good cook book because it has a lot of old, tried-and-true Sugar Valley recipes.


One of my favorite recipes in the book is the banana nut bread from Bonnie Holdren. I have never met Bonnie Holdren, but I know she lives on a big farm just outside of Loganton. I've tried several banana nut bread recipes that have buttermilk, cinnamon, etc. in it, but I always come back to this simple and basic one.


I had a few bananas that were riper than I like for eating, so I let them sit on my counter a few days longer and decided I'd make some banana bread since Jordan loves it so much.


Bonnie Holdren's Banana Nut Bread


Ingredients
1/2 cup Crisco
1 cup sugar
2 eggs
1 tsp. soda
1/4 tsp. salt
1 tsp. vanilla
3 large bananas (mashed)
1/2 cup chopped nuts (I use walnuts)


Directions without Pictures
Cream Crisco, sugar and eggs together. Add flour, soda, salt and vanilla. Add bananas and nuts last. Grease loaf pan and bake at 350 degrees for one hour.


Directions with Pictures
Cream Crisco, sugar and eggs together.

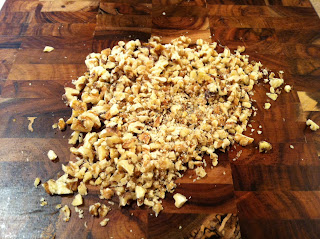
While the mixer is going, I mash the bananas and get the walnuts chopped up.


Once the bananas and walnuts are prepared, everything in the mixer should be creamed together.

Then, add the flour, soda, salt and vanilla.

And mix it up.

Add bananas and nuts last.

Grease a loaf pan (or 3 small ones if you're sharing!) and bake at 350 degrees for one hour. I think my oven runs a little hotter, so I only had mine in for 50 minutes.

After waiting a very long 50 minutes, the banana bread is finally done!


Now it's time to make a pot of coffee and have a mid-morning snack. Jordan better hope there's some left when he gets home from work this afternoon :)

Natural Beauties

Okay... this is so Asian Martha Stewart of me to dote about eggs, but look at these beauties! I was getting ingredients around to make some banana bread this morning and just felt compelled to snap a picture of my pretty eggs.


Here in Sugar Valley, there is a very high population of Amish that started to settle in the 1970s (I think?) from Lancaster county, PA. There are mixed feeling about the Amish community amongst us "English," or non-Amish, but I'll admit, it is really nice to get fresh, brown, free-range eggs for only $1.50 a dozen! I get my eggs from the Zook family who lives just a short drive/medium walk from our house. 

In the summer, I get most of my fresh produce like bell peppers, cucumber, and tomatoes from the local Amish as well. It is way cheaper than getting it from the grocery store, the quality is so much better, and they are much fresher since they haven't been shipped. 

Jordan gripes about how the Amish are hypocrites and are taking over all the old farms here in Sugar Valley, and that is marginally true. But, that's not going to stop me from enjoying the goods I can get from them.
Powered by Blogger.